Docker-compose + Shell 一键化项目部署的一次尝试
2023/04/05
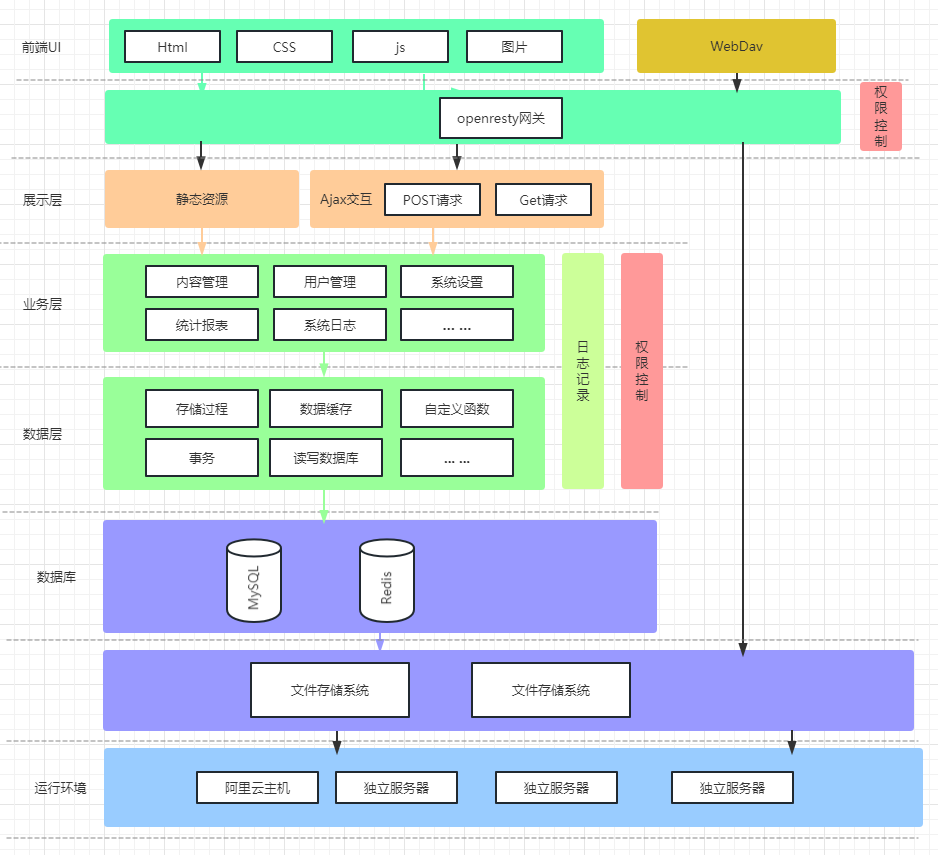
业务场景 某项目存在以下架构
现在需要一键部署自己添加插件编译的 openresty 添加lua脚本以及部署一个基于java的后端服务,并且实现对于java的后端服务实现实时更新的功能,并且通过 Docker Network实现容器之间的相互连接。(如果需要在一键部署中增加redis以及MySQL等等服务也是同理)
前置知识 docker-compose
Compose 是用于定义和运行多容器 Docker 应用程序的工具。通过 Compose,您可以使用 YML 文件来配置应用程序需要的所有服务。然后,使用一个命令,就可以从 YML 文件配置中创建并启动所有服务。
通过docker-compose 可以实现创建多个容器并且控制他们的配置和他们之间的关系,本文将通过docker-compose + shell脚本实现一键化部署。
Docker Network 在Docker中,默认情况下容器与容器、容器与外部宿主机的网络是隔离开来的。安装Docker的时候,docker会创建一个桥接器docker0,通过它才让容器与容器之间、与宿主机之间通信。
建议使用自定义的网桥来控制哪些容器可以相互通信,可以通过容器名来实现ip的解析。
在docker-compose.yml中添加以下配置实现创建自定义网桥并且实现容器加入网桥
1
2
3
4
5
6
7
8
9
10
11
12
13
14
15
16
17
version: '3' services: web: ... container_name: oss-application ... networks: - oss-networks openresty: .... container_name: oss-openresty .... networks: - oss-networks networks: oss-networks: driver: bridge
编写Openresty的Dockerfile 因为要自己重新编译一遍 故base image使用 ubuntu:22.04 给docker容器里的apt换源并且安装Openresty运行与编译所需要的相关依赖 1 2 3 4 5 6 7 8 9 10 11 12 13 RUN rm /etc/apt/sources.list && \ touch /etc/apt/sources.list && \ echo "deb http://mirrors.tuna.tsinghua.edu.cn/ubuntu/ jammy main restricted universe multiverse" >> /etc/apt/sources.list && \ echo "deb http://mirrors.tuna.tsinghua.edu.cn/ubuntu/ jammy-updates main restricted universe multiverse" >> /etc/apt/sources.list && \ echo "deb http://mirrors.tuna.tsinghua.edu.cn/ubuntu/ jammy-backports main restricted universe multiverse" >> /etc/apt/sources.list && \ echo "deb http://mirrors.tuna.tsinghua.edu.cn/ubuntu/ jammy-security main restricted universe multiverse" >> /etc/apt/sources.list && \ apt-get clean all RUN apt-get update && \ apt-get install -y build-essential libpcre3-dev zlib1g-dev libssl-dev git wget perl curl libxml2 libxml2-dev libxslt-dev
编译Openresty 并添加需要的模块 1 2 3 4 5 6 7 8 9 10 11 12 13 14 15 16 17 18 19 20 21 COPY ./source/openresty-1.21.4.1.tar.gz / RUN cd / && \ tar -xzvf openresty-1.21.4.1.tar.gz && \ cd openresty-1.21.4.1/ COPY ./source/nginx-dav-ext-module-3.0.0.tar.gz /openresty-1.21.4.1/ RUN cd /openresty-1.21.4.1 && \ tar -xzvf nginx-dav-ext-module-3.0.0.tar.gz && \ mv nginx-dav-ext-module-3.0.0 nginx-dav-ext-module RUN cd /openresty-1.21.4.1 && \ ./configure --prefix=/usr/local/openresty \ --with-http_dav_module \ --add-module=nginx-dav-ext-module \ --without-http_gzip_module && \ make && \ make install
这里添加的是http_dav_module以及nginx-dav-ext-module模块,可以根据自己的需求定制
配置Openresty 相关内容 1 2 3 4 5 6 7 8 9 RUN rm -rf /usr/local/openresty/nginx/conf/nginx.conf && \ mkdir -p /usr/local/openresty/nginx/lua && \ mkdir -p /toss/tmp COPY ./nginx.conf /usr/local/openresty/nginx/conf/ COPY ./lua/referer_and_down_auth.lua /usr/local/openresty/nginx/lua/ COPY ./lua/webdav_auth.lua /usr/local/openresty/nginx/lua/ EXPOSE 80
这里可以拷贝一些自己要运行的脚本和nginx的配置文件,后面通过路径映射配置也是可以的
运行openresty 1 2 CMD ["/usr/local/openresty/bin/openresty" , "-g" , "daemon off;" ]
完成Dockerfile 1 2 3 4 5 6 7 8 9 10 11 12 13 14 15 16 17 18 19 20 21 22 23 24 25 26 27 28 29 30 31 32 33 34 35 36 37 38 39 40 41 42 43 44 45 46 47 48 49 50 51 52 53 54 FROM ubuntu:22.04 RUN rm /etc/apt/sources.list && \ touch /etc/apt/sources.list && \ echo "deb http://mirrors.tuna.tsinghua.edu.cn/ubuntu/ jammy main restricted universe multiverse" >> /etc/apt/sources.list && \ echo "deb http://mirrors.tuna.tsinghua.edu.cn/ubuntu/ jammy-updates main restricted universe multiverse" >> /etc/apt/sources.list && \ echo "deb http://mirrors.tuna.tsinghua.edu.cn/ubuntu/ jammy-backports main restricted universe multiverse" >> /etc/apt/sources.list && \ echo "deb http://mirrors.tuna.tsinghua.edu.cn/ubuntu/ jammy-security main restricted universe multiverse" >> /etc/apt/sources.list && \ apt-get clean all RUN apt-get update && \ apt-get install -y build-essential libpcre3-dev zlib1g-dev libssl-dev git wget perl curl libxml2 libxml2-dev libxslt-dev COPY ./source/openresty-1.21.4.1.tar.gz / RUN cd / && \ tar -xzvf openresty-1.21.4.1.tar.gz && \ cd openresty-1.21.4.1/ COPY ./source/nginx-dav-ext-module-3.0.0.tar.gz /openresty-1.21.4.1/ RUN cd /openresty-1.21.4.1 && \ tar -xzvf nginx-dav-ext-module-3.0.0.tar.gz && \ mv nginx-dav-ext-module-3.0.0 nginx-dav-ext-module RUN cd /openresty-1.21.4.1 && \ ./configure --prefix=/usr/local/openresty \ --with-http_dav_module \ --add-module=nginx-dav-ext-module \ --without-http_gzip_module && \ make && \ make install RUN rm -rf /usr/local/openresty/nginx/conf/nginx.conf && \ mkdir -p /usr/local/openresty/nginx/lua && \ mkdir -p /toss/tmp COPY ./nginx.conf /usr/local/openresty/nginx/conf/ COPY ./lua/referer_and_down_auth.lua /usr/local/openresty/nginx/lua/ COPY ./lua/webdav_auth.lua /usr/local/openresty/nginx/lua/ EXPOSE 80 CMD ["/usr/local/openresty/bin/openresty" , "-g" , "daemon off;" ]
编写java应用后端的Dockerfile 这一部分网上很多相似的配置文件没什么好说的
1 2 3 4 5 6 7 8 9 10 11 # java 环境 FROM openjdk:17 -jdk-slim # 定义工作目录 WORKDIR / # 把项目中的所有东西复制到工作目录(app)下面 (这里可以改成自己的jar包) COPY ./f-oss-0.0 .1 -SNAPSHOT.jar / # 改变容器的时区 RUN ln -sf /usr/share/zoneinfo/Asia/Shanghai /etc/localtime RUN echo 'Asia/Shanghai' >/etc/timezone #端口号 (这里可以改成自己的运行命令) ENTRYPOINT ["java" ,"-jar" ,"/f-oss-0.0.1-SNAPSHOT.jar" ,"--spring.profiles.active=pro" ]
通过docker-compose.yml部署 1 2 3 4 5 6 7 8 9 10 11 12 13 14 15 16 17 18 19 20 21 22 23 24 25 26 27 28 29 30 31 version: '3' services: web: restart: always build: ./application container_name: oss-application dns: - 223.5 .5 .5 - 223.6 .6 .6 volumes: - /toss:/toss:rw networks: - oss-networks openresty: restart: always build: ./openresty ports: - 12345 :80 container_name: oss-openresty dns: - 223.5 .5 .5 - 223.6 .6 .6 volumes: - /toss:/toss:rw networks: - oss-networks networks: oss-networks: driver: bridge
目录结构
│ docker-compose.yml
在上面的 docker-compose 中将会自动从两个dockerfile中构建docker image,运行,实现目录挂载,端口映射,加入网桥等等操作
通过运行 docker-compose up可以看到两个docker container已经被成功拉起
shell 脚本的引入 通过上面的部署发现当java后端应用更新之后要手动更新重新构建之后的f-oss-0.0.1-SNAPSHOT.jar,从而实现容器中的应用更新。
我们可以通过实现shell脚本实现每次启动时检查更新,并且自动替换f-oss-0.0.1-SNAPSHOT.jar,重新构建镜像
1 2 3 4 5 6 7 8 9 10 11 12 13 14 15 16 17 18 19 20 21 22 # !/bin/bash # Check if Docker Compose is installed if ! [ -x "$(command -v docker-compose)" ]; then echo 'Error: docker-compose is not installed.' >&2 exit 1 fi # Check if wget is installed if ! [ -x "$(command -v wget)" ]; then echo 'Error: wget is not installed.' >&2 exit 1 fi if 检查更新逻辑 then 下载最新版 f-oss-0.0.1-SNAPSHOT.jar docker-compose build (你的service name) fi # 拉起容器 docker-compose up -d